Last updated November 17, 2026
Free written scope consultation - allowances, timeline, and change-order rules on paper before a single trade is scheduled
DIY vs Professional Driveway & Pavers: What’s Safe to Do Yourself
Homeowners who lay pavers on a hand-tamped base instead of a machine-compacted one are building a 10-year driveway on a 3-year foundation. The pavers will outlast the base every time. That single fact reframes the entire DIY-versus-hire debate: the decision isn’t mostly about whether you can lay a nice herringbone pattern, it’s about whether you have access to a plate compactor delivering at least 3,500 lbs of centrifugal force, and a truck to haul it. In Torrance, where driveways sit on expansive clay soils that move with the winter rains, a weak base fails faster than it would almost anywhere else. This guide breaks the job into what’s genuinely safe to do yourself (pattern, cutting, sanding, sealing) and what isn’t (base prep), with real dollar numbers so you can price both paths honestly.
Quick Answer
You can safely DIY the visible layer of a paver driveway: pattern layout, cutting with a wet saw, joint sanding, and sealing. You should not DIY the base compaction for a vehicular driveway, because it requires a plate compactor rated at 3,500 lbs of centrifugal force or more and a documented 95% Proctor density, which rental machines and hand tampers rarely achieve. Everything above the base is legitimately yours to do; the base is where driveways fail.
Styles & brands we work with
- Kitchen remodeling
- Bathroom remodeling
- Home additions & ADU
- Roofing
- Windows & doors
- Driveway & pavers
- Fence
Table of Contents
- The Base-Prep Equipment Threshold
- Exactly What’s Safe to Do Yourself
- Real Cost Comparison: 400 sq ft in Torrance
- Three DIY Failures, What They Cost, and When They Appear
- How to Supply-Manage Without Touching the Work
- What a Contractor Should Show You
- Common Mistakes to Avoid
- When to Call a Professional
The Base-Prep Equipment Threshold
A hand tamper weighs about 10 to 15 pounds and delivers a few hundred pounds of impact force per blow. A plate compactor rated for a residential driveway delivers 3,500 lbs of centrifugal force or more, running at roughly 5,000 to 6,000 vibrations per minute. Those aren’t two versions of the same tool; they’re different classes of machine. And the machine is only half the problem. A plate compactor that size weighs 150 to 200 lbs, which means you need a pickup or a trailer to move it. Rental yards in the South Bay charge $150 to $200 per day for a machine in that class, plus a damage waiver and fuel, and they typically won’t rent it to you without a truck rated for the load. If you’re in a North Torrance neighborhood where driveways sit close to the street, moving the material and the machine by hand across a 400 sq ft pad is its own weekend.
Compaction happens in lifts, meaning you compact the base material in layers of roughly 2 to 4 inches, then wet it, then compact again, until the full base depth is built up. A 4-inch base on a vehicular driveway is the light specification; 6 to 8 inches of compacted Class II aggregate base is the realistic number for a driveway carrying two cars. Each lift is compacted multiple passes in two directions. That’s why compaction isn’t a step, it’s the whole job.
Exactly What’s Safe to Do Yourself
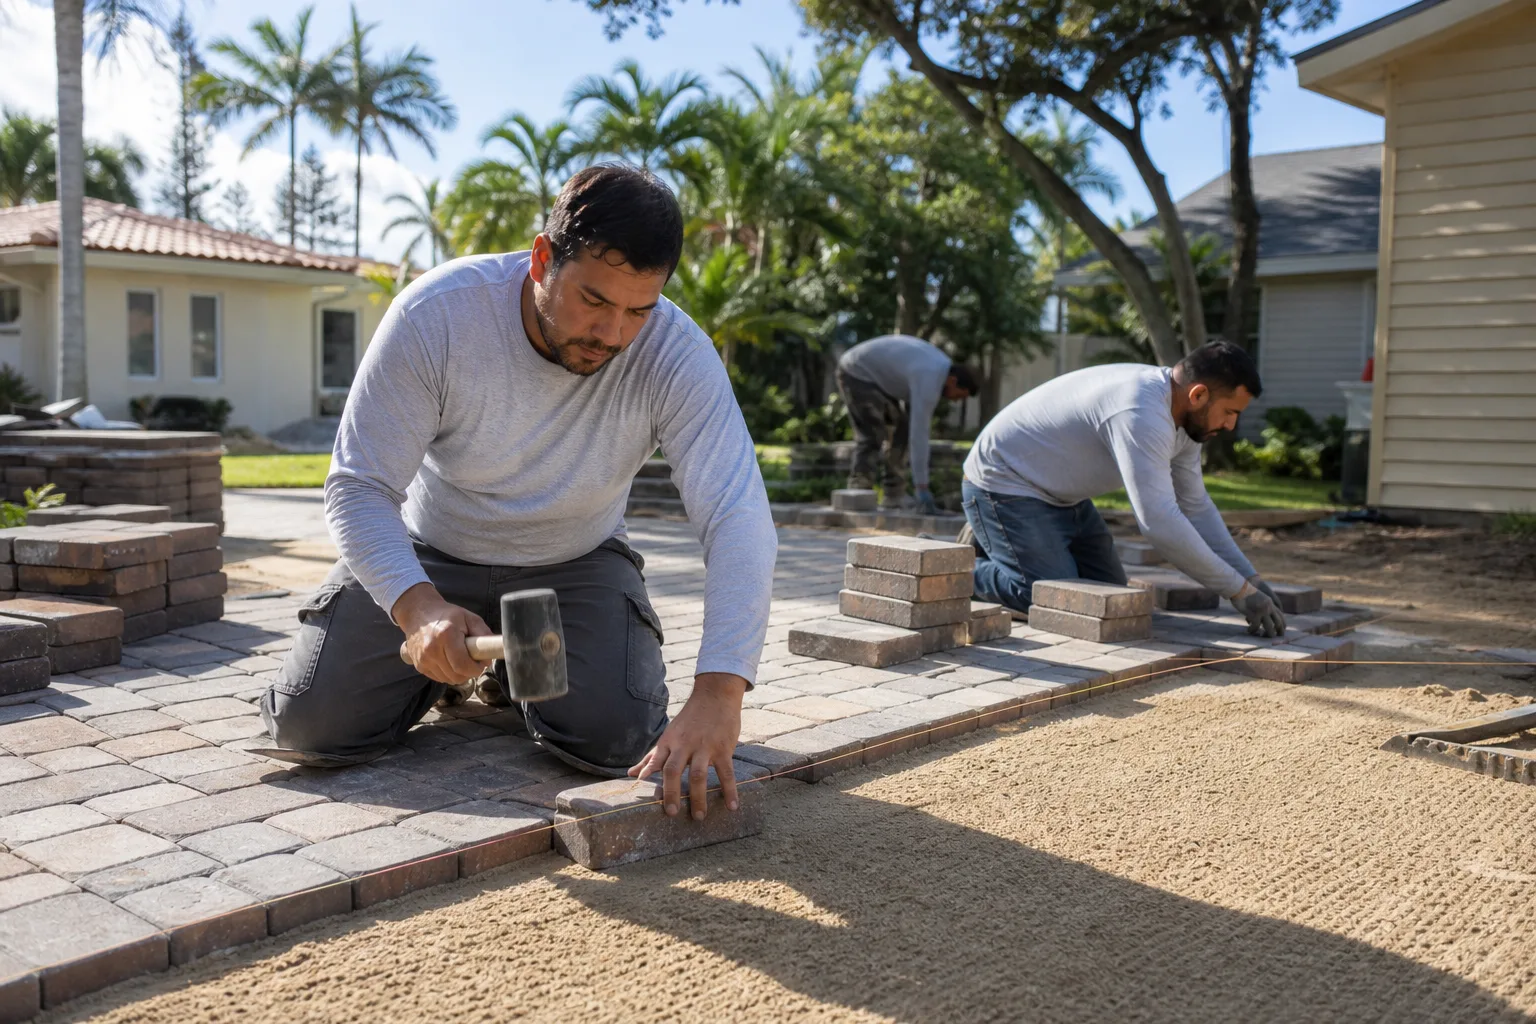
Once the base is built correctly and the edge restraints are set, the work above it is careful homeowner territory. The tools are manageable, the mistakes are recoverable, and the skill is mostly patience. Here’s what’s genuinely DIY-safe on a driveway and pavers project, with realistic equipment and time estimates for a 400 sq ft driveway.
- Pattern layout and setting lines. A chalk line, a string line, and a 4-foot level. Half a day to a full day. Mistakes here cost you re-laying an area, not a new base.
- Placing and aligning pavers. Rubber mallet, knee pads, and a spacer gauge set to your joint width (3/16 inch is common). Lay in a running bond or herringbone pattern from a fixed corner. Two full days for a careful first-timer.
- Cutting pavers. A wet saw with a diamond blade for concrete pavers ($60 to $120 per day to rent, $250 to $600 to buy), or a mechanical splitter ($40 to $80 per day) for straight cuts. Plan on one full day for the cuts on a 400 sq ft driveway, including outfield cuts along curves and edges.
- Edge restraint installation. Plastic or aluminum edge restraint spiked into the base. Half a day. This step is not optional; paver edges spread outward without it.
- Joint sanding. Polymeric sand swept into the joints, misted, and left to cure for 24 hours. Half a day plus a cure day. Polymeric sand locks the pavers and resists rain, which matters in Torrance where our wet season concentrates in a few months.
- Sealing. A penetrating or film-forming sealer applied with a roller in dry weather, above 50°F, and no rain for 24 to 48 hours. One day plus two days of cure. Skip sealing if you want a matte look; sealing helps with weed resistance and color stability.
The base is excluded from this list on purpose. It’s the one part of the job where a homeowner’s best effort still commonly fails the spec, and where the failure is expensive because it’s hidden under the pavers.
Real Cost Comparison: 400 sq ft in Torrance
Online paver calculators get you close on material and then quietly leave out the line items that decide the actual budget: rental equipment, disposal, base material delivered, edging, polymeric sand, and the waste factor. Here’s a realistic side-by-side for a 400 sq ft driveway in Torrance, using mid-range concrete pavers and a 6-inch compacted base. These are planning ranges, not a quote, but they’re the numbers you should screenshot and compare against whatever comes back.
- DIY materials only: pavers at $3.00 to $5.50 per sq ft (including a 10% waste factor for cuts) = $1,320 to $2,420
- DIY base material: Class II aggregate base, delivered, 6 inches compacted over 400 sq ft = $500 to $800
- DIY rental equipment: plate compactor, wet saw, delivery/pickup = $300 to $500
- DIY edge restraint and polymeric sand: $250 to $400
- DIY disposal: hauling away old concrete or soil, dumpster or bagster = $250 to $450
- DIY sealer and supplies: $150 to $300
- DIY total: roughly $2,770 to $4,870, before your own labor, which is 5 to 8 working days
- Contracted price, driveway and pavers in Torrance: $6,500 to $11,500 for the same 400 sq ft, depending on paver brand, removal, and site access
The gap between those two ranges is $3,700 to $6,600, and it’s real, but it isn’t the “savings” number the calculators imply. It’s the price of the compaction spec, the crew’s experience, the disposal arrangements, the warranty, and the fact that a contractor is liable if the base fails. If you self-perform the base and it fails in 3 years, you’re paying remediation out of pocket with no warranty behind it. For the broader Torrance picture, see our page on Driveway & Pavers in Torrance.
Three DIY Failures, What They Cost, and When They Appear
In our experience, driveway paver failures cluster into three patterns that appear on a predictable timeline. We’ve seen all three in Torrance because our clay-heavy soils and concentrated winter rains make weak bases fail faster. The pavers themselves almost never fail; the layer beneath them does.
- Rutting along the tire paths, appearing in year 1 to 2. Cause: insufficient compaction passes or too-thick lifts during base install. The driveway develops shallow channels where the car sits, joints start to open, and the pavers rock slightly underfoot. Remediation means lifting pavers, correcting the base, and relaying: $3,000 to $5,500 on a 400 sq ft driveway, because the base work that should have been done originally now also includes handling the existing pavers.
- Edge spreading and joint separation, appearing in year 2 to 4. Cause: missing or shallow edge restraint, which lets paver courses creep outward. You’ll see the outermost course migrating toward the street, widening joints, and in a South Torrance neighborhood where driveways abut the sidewalk, this can trigger a sidewalk repair notice. Remediation: $800 to $1,800 to reset the edge and relay borders.
- Joint sand loss, weeds, and settlement, appearing in year 3 to 5. Cause: polymeric sand applied to a base that wasn’t dense enough to hold the pavers stable, so joints open every spring, sand washes out, and weeds establish. Remediation: $1,200 to $2,500 for re-sanding, weed control, and spot base correction.
Each of those failures costs more to fix than the base work would have cost to do correctly once. That’s the arithmetic that reframes the decision: DIY is a good deal on the visible layer and a bad deal on the hidden one.
How to Supply-Manage Without Touching the Work
Here’s a middle path most homeowners don’t know they have. You can buy the pavers yourself, pick the exact brand and color you want, and have them delivered to the job, which removes the contractor’s markup on the largest material line. A paver driveway job quoted at $8,500 might include $1,800 of paver material at cost plus markup; if you source the same pavers directly, you keep the difference, and the contractor still does the base prep, cutting, layout, and installation under the same warranty terms. That’s a legitimate way to save 5 to 15% of the project without compromising the base work.
Where this gets interesting is brand choice. Torrance homeowners shopping paver material for a driveway often look at Belgard and Techo-Bloc because both are spec’d widely in South Bay projects and have local availability. If you’re pairing the driveway with a home addition or an ADU, your material choices for the driveway, patio, and hardscape all interact with the site plan, so it pays to lock the paver selection before the addition drawings are finalized. For that side of the project, see our page on Home Additions & ADU in Torrance. Our guidance on any written estimate also stands: bring a competitor’s quote and we’ll review it line by line at no charge under our Free Second Opinion offer. More on that below.
What a Contractor Should Show You
When you hire, you’re paying for the compaction spec and the documentation that proves it was met. A contractor who can’t or won’t describe their base spec in specific terms is telling you something. Here’s what to ask, and what a serious answer sounds like.
- What base material, and at what compacted depth? A serious answer names the material (Class II aggregate base is the residential standard) and the compacted depth in inches, in writing, before the job.
- What compaction density is specified, and how is it verified? A 95% Proctor density spec on a vehicular driveway is a reasonable standard. Verification can be through lift placement records, compaction passes documented in a photo record, or on larger jobs, a density test. Under The Haven Standard, every visit includes a documented photo record as a standard deliverable, not an add-on; that photo record is your evidence of what the crew found and what they did.
- What edge restraint, and how deep is it set? Specific product by name, set into the compacted base, spiked at the manufacturer’s spacing.
- What’s the written warranty on the installation? A written warranty with terms, not “we stand behind our work.” Our 365-Day Done Right Promise is on every printed quote, backed by a terms page.
- Is removal and disposal included in the written price? Disposal is one of the line items most commonly added after the fact; the written price should show it up front or clearly exclude it. Our position is that no work proceeds on a change until the change order is signed – the discipline that keeps projects within a few percent of the agreed number.
If you’re considering pairing the paver driveway with a fence along the back run of the lot, the sequencing matters: fence posts are set in concrete and should go in before the finished pavers, or the paver crew has to cut around post footings. Our page on Fence Installation in Torrance covers the sequencing details. For our full set of trades and how we price them, see the Rowan Construction Group Torrance home page.
Common Mistakes to Avoid
- Compacting the base with a hand tamper. It’s the single biggest cause of driveway failure. A hand tamper can pass on a narrow walkway but not on a pad carrying two cars, and the failure won’t show up for a year or more.
- Skipping the edge restraint or using it only on the street side. Paver courses creep outward, opening joints. Both long edges and any exposed end need restraint set into the compacted base.
- Applying polymeric sand to a wet base. Polymeric sand needs a dry substrate and a dry joint cavity to cure properly. In Torrance, our wet season runs roughly November through March, and sand applied to damp joints will fail by the next spring.
- Not accounting for our clay soils. The expansive clay under much of Torrance moves with seasonal moisture. That makes proper base depth and drainage more important here than in coastal communities built on sand.
- Cutting pavers with a circular saw and a dry mason blade. Dust, chipped edges, and inconsistent cuts along the visible edge. A wet saw gives a clean cut and controls the silica dust, which is a real health hazard.
- Ordering exactly the square footage of pavers and no waste. Plan on a 10% waste factor for cuts, breakage, and future repairs. A slightly larger order from the same batch is one of the ways to avoid visible color-run mismatches years later.
- Starting the base in spring without checking drainage. A Torrance driveway built flat to the street has no place for rain to go. Correct grading directs water away from the foundation and the garage slab, and it’s much cheaper to get right at the base stage than to correct later.
When to Call a Professional
Call a professional when the job involves any of the following: a full base install on a vehicular driveway, removal and disposal of existing concrete, grading corrections, or the drainage work that goes with it. Call even if you plan to supply the pavers yourself and do the cutting, because the base is where the driveway lives or dies, and the liability for a failed base falls on whoever built it. In our experience, the calls we get about paver driveways in Torrance that are failing at year 3 trace back to base work done without the equipment to reach spec. Rowan Construction Group Torrance offers free estimates in Torrance – call (888) 349-6729. Every estimate comes with a written flat price before any work begins, and crews are background-checked, uniformed, and arrive with a documented photo record up front.
See the difference
 Before
 After
 Before
 After
 Before
 After
Frequently Asked Questions
You can lay the pavers yourself, but you should not build the base yourself for a vehicular driveway. Laying the pavers, cutting with a wet saw, joint sanding, edge restraint, and sealing are all within the reach of a careful homeowner. The base compaction, which needs a plate compactor rated at 3,500 lbs of centrifugal force or more and a documented 95% Proctor density, is where DIY driveway and pavers projects most commonly fail. Call (888) 349-6729 for a written estimate on the base work if you want to self-perform the visible layer.
A 400 sq ft paver driveway in Torrance typically prices at $6,500 to $11,500 when contracted, depending on paver brand, base depth, removal, and site access. DIY materials and rentals for the same size run $2,770 to $4,870, before your labor of 5 to 8 working days, and that’s assuming the base work meets spec. Call (888) 349-6729 for an exact written quote – estimates are free.
A contractor should state, in writing, the base material (Class II aggregate base is standard for residential driveways), the compacted depth in inches, and the compaction approach. A 95% Proctor density on a vehicular driveway is a reasonable standard. Ask for the photo record of the compaction phases, which is a standard deliverable on every Rowan Construction Group Torrance visit. If a contractor can’t describe the spec in specific terms, that’s the answer. Call (888) 349-6729 to see what a written base spec looks like.
On a properly priced job, no – and if it does, no change should proceed without a signed change order. Under Clause 1 of The Haven Standard, the written price comes before anyone picks up a tool, and no work proceeds on a change until the change order is signed. That discipline is why our projects finish within a few percent of the agreed number. Call (888) 349-6729 to schedule your free estimate.
DIY, plan on 5 to 8 full working days for a 400 sq ft driveway, assuming you’ve already secured the compactor, wet saw, base material, and disposal. Contracted, a two-to-three person crew typically finishes a 400 sq ft driveway in 2 to 4 working days, weather permitting. In Torrance, winter rain can push the schedule by 3 to 7 days because the base needs dry weather to compact and the sealer needs 24 to 48 hours of dry cure. Call (888) 349-6729 for a schedule estimate on your property.
It depends on the scope. A straight paver replacement within the existing driveway footprint often doesn’t require a permit. Widening the driveway, changing the curb cut or apron, or altering drainage can trigger a permit or a right-of-way review, and that’s a conversation to have before you order material. The authoritative answer is with the city’s building and public works departments on your specific address; a written scope from a contractor should state whether permits are included. Call (888) 349-6729 for a free estimate that addresses the permit question up front.
The Bottom Line
The DIY-versus-hire decision on a paver driveway isn’t about skill level, it’s about access to equipment. Laying pattern, cutting with a wet saw, edge restraint, joint sanding, and sealing are all legitimately yours to do, and doing them well saves real money. Base compaction requires a machine in a different class than anything you’ll move by hand, and it’s the layer that fails first and costs the most to correct. If you want to supply-manage the pavers and self-perform the visible work, that’s a defensible plan. If you’re building the base, that’s where a written price and a documented record earn their keep. The pavers always outlast the base.
Call (888) 349-6729 to schedule your free estimate with Rowan Construction Group Torrance. We put the price in writing before any work starts, and you’ll get a documented photo record of the base and every phase that follows.
Written by the team at Rowan Construction Group Torrance.